Table of Contents
Design Tab
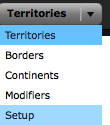
This is where the magic happens, and where you'll spend most of your time. The pull-down menu on the left lets you select five different design areas.
Territories
The territories you have made on your map are not recognized by the Designer until you identify them.
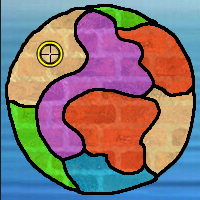
- Click on the board image to place the territory. You can drag the bull's-eye in order to place it precisely as possible.
- Give the territory a unique name. (If you leave the space blank the Designer will use a default naming protocol → T1, T2, etc..)
- Set the maximum # of units that the territory can hold. Default → 'Unlimited'.
- Hit Apply
Here, the designer has defined and named the territory 'Northwest.' It is limited to holding a maximum of 10 units. 'Placement Enabled' means that players are allowed to place their bonus units on the territory.
Tips:
- You can set a global board level territory limit in the Rules section also.
- If you make a mistake or wish to move or rename your territory, use the 'Edit' button to re-position or rename the territory.
- The 'Select All' and 'Select Multiple' buttons can be used when attempting to move All or Multiple territories at once, and also for setting All or Multiple territories to a specific maximum unit value.
- If you are using the Fill Mode, be sure to toggle the 'Fill' button toggle to see how your territories will fill in a game. Toggle multiple times and the colors randomly cycle.
- Save often - Especially if you have a lot of territories to enter into the Designer.
Borders
Territories that touch (are contiguous) on your map are not recognized as sharing a border by the Player until you identify them. Once you have selected the 'Border' menu, you may define borders by selecting two territories and hitting the “Apply” button.
Note
- The order you chose your territories is important when selecting any 'One-way' border.
Really Super-Important Note:
- Especially for larger maps, while creating borders, hit the Save button in the upper right hand corner of the designer often!
One-way/Two-way - Default → Two-way. When selecting One-way, the order in which you select the territories becomes relevant.
Artillery - This can be used to simulate an artillery attack across the border - the attacking player can attack and kill defending units but can't occupy the defending territory only reduce the defending units to 1 (or 0 if the territory abandonment rule is on).
Attack Only - Players can only attack across this border and transfer their units across after a successful attack, they are not permitted to move units across the border in the fortify phase.
Fortify Only - This is the opposite of the Attack Only border - with this border type the player can only move units across the border in the Fortify phase.
View Only - This border type is only relevant when the game is played with Fog. When a player occupies the territory they can view the territory on the other side of the border but not attack or fortify to it - this could be used for example to give a watchtower position the ability to view enemy units but not be able to attack them. Continents
Here is an example of the menu using some of the above border modifications..
Handy Border Creation Tools
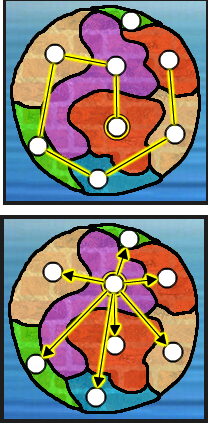
You don't have to make them one at a time, constantly having to hit the “Apply” button as you make each one. The designer includes a few handy tools to help make creating borders faster and easier.
Chain - Creates a border between each territory chosen and the previously chosen territory.
Tether - A border is created between the first territory selected and every territory selected thereafter.
Modifiers
Border modifiers are an optional advanced gameplay feature that can be used to make it more or less likely that an attack over a particular border is successful. For instance, they can be used to simulate an artillery position attacking enemy units - where you would expect artillery to enjoy an advantage against enemy troops.
Border modifiers add to or subtract from the number of sides of the dice that the attacker and/or defender roll. Modifier values are added to the global dice settings, for which the default is 6-sided. For example, given the default global dice, a modifier of -2 would create 6 minus 2 = 4-sided dice.
Modify borders using the following sequence:
- Select the territory whose attack dice you wish to modify
- Select the territory whose defense dice you wish to modify
- Adjust dice values
- Hit 'Apply'
Notes:
- The order in which you select the territories is important.
- A border must already exist in the direction selected.
- Border modifiers only apply in one direction so if you would like to set a border modifier in the opposite attack direction then select the territories in the opposite order and repeat.
- Remember to Save.
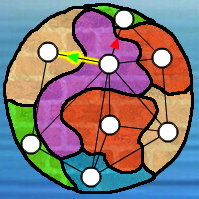
In this image, the designer has clicked on the large purple territory first - then the northwest territory. The attack line is highlighted (yellow), and the Attack and Defend dice modifiers seen in the menu only apply to attacks moving in that direction.
- Green arrows indicate that the attacker has the advantage.
- Red arrows indicate that the defender has the advantage.
Continents
The continents determine the unit bonuses given to players at the start of their turn for occupying specific territories on the board. For example, on the Global Warfare board the continent bonus is +2 units for occupying all the territories in Australasia. Continent bonuses can be positive or negative and can overlap (i.e. a single territory can be part of more than one bonus). The Designer shows territories that are already part of a continent bonus in blue for easier reference.
In this example, four territories have been selected and designated as a 'Continent' that the designer has named “Northern Hemisphere,” which will yield a bonus of 1 unit.
Factories
Factories are a special and powerful type of continent that require a separate tutorial, which you can find here.
Setup
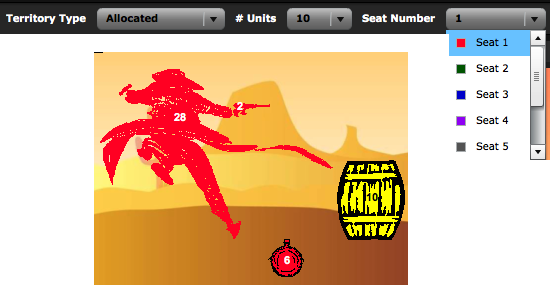
The Setup option can be used by the designer to set up the board in a pre-determined way at the start of the game. For Setup to be honored in a game the Rule “Initial Setup” must be set to “Setup based”. In the Scenario view you can click on any of the territories on the board and set whether you would like them to be initially one of the following options:
- Allocated - This means the territory is allocated to the specified seat and has the specified number of units at the start of the game.
- Capital City - The territory is allocated to a particular seat, has the specified number of units and is also a Capital City.
- Neutral - The territory will be assigned as a neutral with the specified number of units.
- Neutral Capital - The territory is allocated as a neutral with the specified number of units and is also a Capital City.
- Unset - If you don't set a scenario option for a territory then it will be randomly given to a player or set as neutral at the start of the game as per a default (non-Setup based) game.
In the set-up above, the barrel is selected (selected territories always turn yellow), it is designated as Allocated to the 1st player (the red player), and it will start the game with 10 units.
- Very Important - Your setup will not work until you make it active on the rules tab.
- If you create a game board with 6 player seats in the Setup but a game is started with only 4 players (if you chose to set the min/max players like this) then each player will be allocated a random seat at the start of the game and the rest of the player seat positions will become neutrals.
- Player colors aren't relevant to the colors that the players choose when they start the game, i.e. players get assigned to a random seat position at the start of the game irrespective of which color they choose.
- If this next suggestion doesn't annoy you, then we haven't said it enough. Remember to Save and Save often.

